
Electron is a framework to develop cross platform desktop applications with web technologies like HTML, JS and CSS. To make the applications feel native, Electron supports a wide variety of native APIs. One of these APIs is the Notification API which allows you to create native desktop notifications for macOS, Windows and Linux. However, when it comes to the actions property of the Notifications API, the only supported platform is macOS. It may seem like it is not possible to create notifications with action buttons for Windows, which would be really disappointing if you want your app to feel native on Windows – the platform with the highest market share.But fortunately there is a way to create Windows notifications with action buttons. Since 2020 Electron offers full support for Windows notifications via XML so you no longer need additional npm packages or other complicated workarounds.The pull request that adds this ability to Electron has the following description:
Windows notifications allow many layouts and different activation methods. Exposing all possibilities through properties on the NotificationOption object would be extensive as well as the different code paths to achieve an arbitrary layout/design of a notification. Instead the options object can now take valid Toast XML This also allows using protocol activation and will work with persisted notifications in Action Center. [...]
Sadly, the Electron documentation describes the toastXML property of the Notification API only as follows:
A string property representing the custom Toast XML of the notification.
That is not a lot to go on.So that you don't have to do the same, I went through all the Microsoft documentation and wrote this tutorial to make it easier for everyone to implement Windows notifications with action buttons in the future. I have also created a demo app which you can browse on GitHub: Electron-Counter-Notification-App.
Create native Windows notifications with XML
Let's dig into Electron’s Notification API. When creating a native notification, we need to create an instance of the Notification class. The constructor takes several options, but the only one we need for our Windows notifications is the toastXML property. We then need to simply show the notification by calling the show() method.
import { Notification } from "electron";
const notification = new Notification({
toastXML: 'Our valid XML string goes here'
});
notification.show();
Before we start writing XML we need to choose a template. Microsoft’s documentation offers some templates you can choose from. For now we are going to stick with ToastText02. This is how a notification using this template could look like:
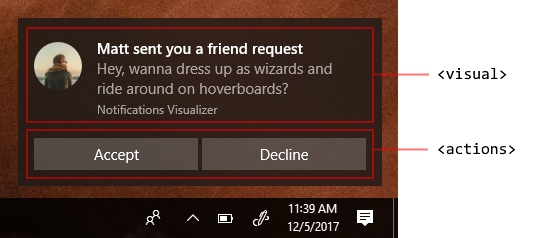
We can simply modify the XML from the Microsoft docs. Here is the XML:
<toast>
<visual>
<binding template="ToastText02">
<text id="1">Notification Header</text>
<text id="2">Notification subheader</text>
</binding>
</visual>
<actions>
<action
activationType="protocol"
arguments="myapp://test"
content="Trigger Action"
/>
</actions>
</toast>
Using this as the value for the toastXML property in your notification object is all you need to create native Windows notifications with action buttons. But getting the action buttons to actually do anything requires more work.
The only Activation Type Electron Supports
What you need to know to get your action buttons working is that the only supported activation type for Windows notifications in Electron is protocol. Using any other activation type which Windows natively offers will simply lead to action buttons doing nothing.The activation type protocol tries to open the uri which is provided in the arguments property of the action element in your XML. If we want Windows to open our app when a specific protocol is called, we need to register a custom protocol.
Register a custom protocol for your app
To register a custom protocol for our app we need to call the setAsDefaultProtocolClient method.
import { app } from "electron";
app.on("ready", () => {
app.setAsDefaultProtocolClient("myapp");
}
Now the operating system will call our app whenever a custom uri with our protocol myapp is opened. Electron will emit the event open-uri, where you can retrieve the opened uri.
app.setAsDefaultProtocolClient('myapp');
app.on('open-url', (_event, url) => {
if (!mainWindow ; ; mainWindow.isDestroyed()) {
return;
}
mainWindow.webContents.send('handle-uri', url);
});
We can create a function which parses the uri so that we can use it to trigger different types of actions. Our function could look like this:
window.electron.ipcRenderer.on('handle-uri', (uri) => {
const [protocol, path] = uri.split(':');
const command = path.replace(/\//gi, '');
if (command === 'countdown') {
decrement();
}
if (command === 'countup') {
increment();
}
});
Handle URIs
So now that the operating system knows the protocol to open our app we can modify our notification's XML. We need to insert the correct uri into our action button’s property content.
<toast>
<visual>
<binding template="ToastText02">
<text id="1">The counter needs to be updated</text>
<text id="2">You can count up or down.</text>
</binding>
</visual>
<actions>
<action
activationType="protocol"
arguments="myapp://countup"
content="Count up"
/>
<action
activationType="protocol"
arguments="myapp://countdown"
content="Count down"
/>
</actions>
</toast>
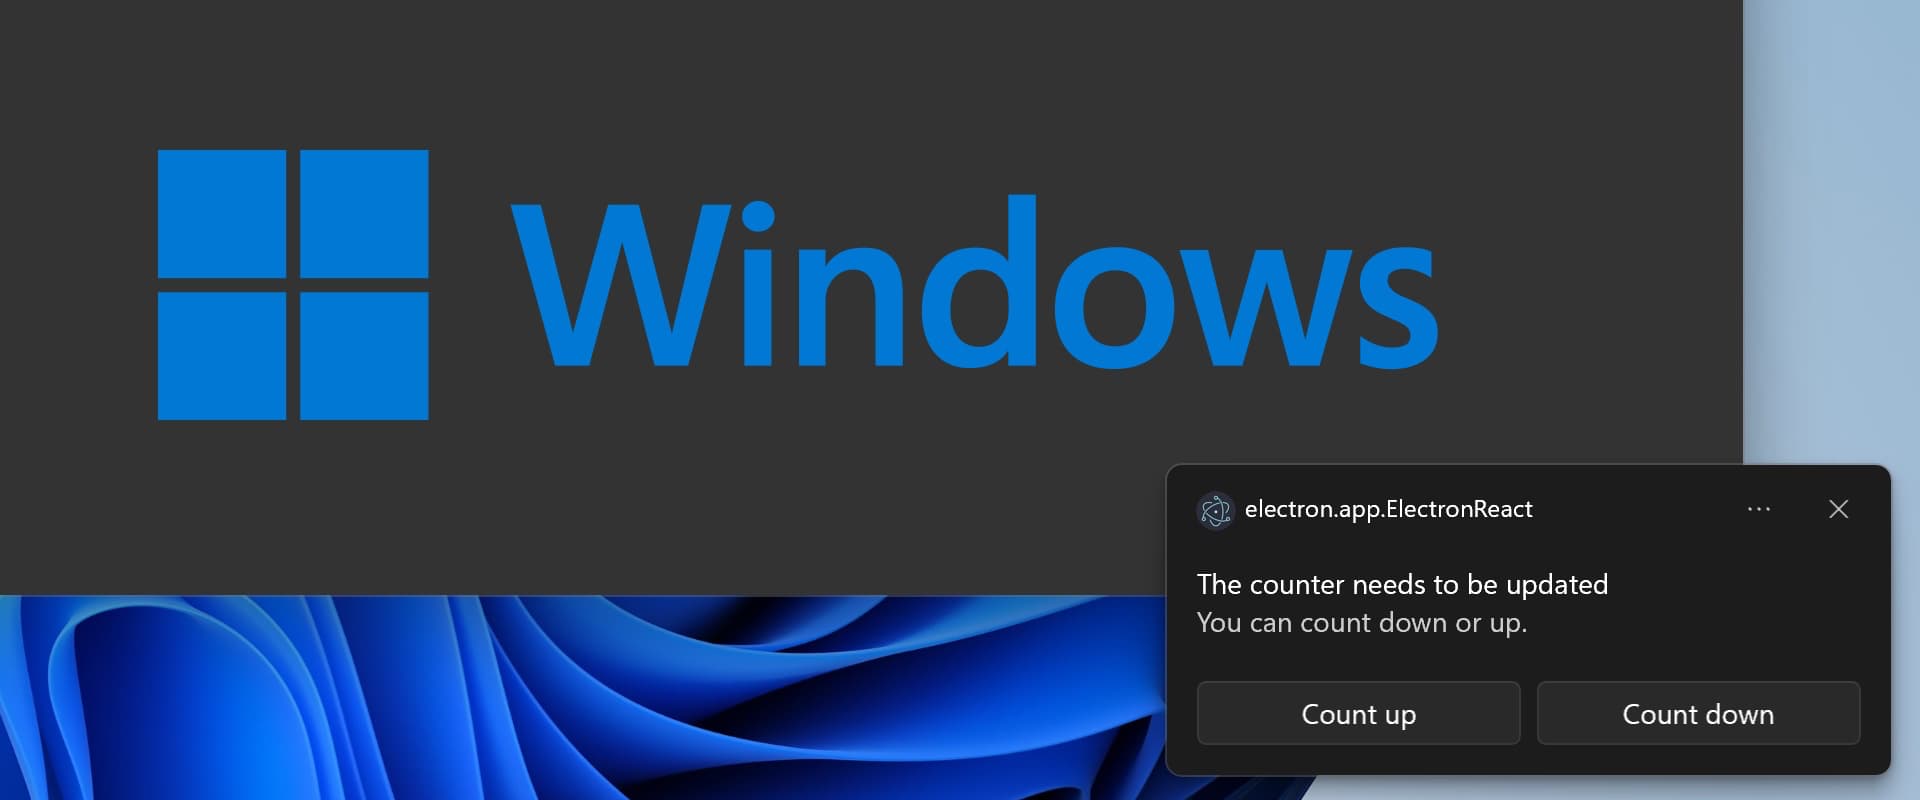
We can now include the XML into the toastXML property of our notification instance.
import { Notification as ElectronNotification } from 'electron';
const notification = new ElectronNotification({
toastXml: `<toast>
<visual>
<binding template="ToastText02">
<text id="1">The counter needs to be updated</text>
<text id="2">You can count down or up.</text>
</binding>
</visual>
<actions>
<action content="Count up" activationType="protocol" arguments="myapp://countup" />
<action content="Count down" activationType="protocol" arguments="myapp://countdown" />
</actions>
</toast>`,
});
notification.show();
So these are the basics you need to create native Windows notifications with a working action button. If you want to display notifications on other operating systems, you will need to add properties like title and body to your notification instance.We could check the platform and create the notification instance like this:
if (platform === 'win32') {
const notification = new ElectronNotification({
toastXml: `<toast>
<visual>
<binding template="ToastText02">
<text id="1">The counter needs to be updated</text>
<text id="2">You can count down or up.</text>
</binding>
</visual>
<actions>
<action content="Count up" activationType="protocol" arguments="myapp://countup" />
<action content="Count down" activationType="protocol" arguments="myapp://countdown" />
</actions>
</toast>`,
});
notification.show();
return notification;
}
const notification = new ElectronNotification({
title: 'The counter needs to be updated',
body: 'You can count down or up. Your decision.',
actions: [
{
type: 'button',
text: 'Count down',
},
{
type: 'button',
text: 'Count up',
},
],
});
notification.on('action', (_, index) => {
if (index === 0) {
// count down button is first element in actions array
if (mainWindow) {
mainWindow.webContents.send('count-down');
}
}
if (index === 1) {
// count up button is second element in actions array
if (mainWindow) {
mainWindow.webContents.send('count-up');
}
}
});
notification.show();
Things to know to make it work perfectly
- First, we need to understand that Windows will try to create a new instance of our app when an uri with our custom protocol is opened. MacOS prevents creating a second instance by default, but prevention does not work when an app is started from a terminal. To prevent this, we need to create a single lock mechanism for our app. The mechanism will check if there is already an instance of our app and if so, it will stop and quit the process of the second instance. We could implement the mechanism like this:
//Request the single instance lock
const isPrimary = app.requestSingleInstanceLock();
app.on("ready", async () => {
//check if this is the only instance
if (!isPrimary) {
/*We are currently running this code in a second instance. We need to quit the process.*/
app.quit();
}
}
You can read more about the single instance lock in the Electron documentation. - When a second instance is opened, we need to retrieve the arguments passed to that second instance which includes the uri that is opened when a notification action button is clicked. To pass that argument to the first instance, we can use the second-instance event:
app.on('second-instance', (_event, argv) => {
if (!mainWindow ; ; mainWindow.isDestroyed()) {
return;
}
const lastArg = argv[argv.length - 1];
if (lastArg) {
mainWindow.webContents.send('handle-uri', lastArg);
}
}); - To create native notifications out of the renderer process, you would need to call a native API from your UI, which can be done in two ways. The first way is using Electron.remote, which is not recommended because of security concerns and the second way is using IPC channels and context isolation. The first allows communication between main- and renderer processes on channels and the latter isolates preload scripts from the renderer's main world to avoid leaking any privileged APIs into your web content's code. Here you can read more about the contextBridge. In my GitHub repository I have extended the contextBridge implementation of Electron-React-Boilerplate to send messages from the main to the renderer process.
Summary
I hope this tutorial sheds some light on the confusing Notification API for Windows and helps other developers bring native Windows notifications to our favorite Electron apps. It would be great if this tutorial is also available on Electron’s documentation, so if you're involved with the Electron documentation feel free to hit me up.
The existence of cross-platform development frameworks is the evidence for a missing standard across all operating systems.